MQTT Publish and Subscribe
Use HTTP and MQTT to connect a device
Introduction
You will use the Raspberry Pi as our sensor device to publish temperature, pressure and humidity data. It will send a current value of every sensor to a MQTT broker. There are many public MQTT brokers (you can set up your own). In this lab you can choose one of the following public brokers.
- mqtt://iot.eclipse.org:1883
- mqtt://broker.hivemq.com:1883
- mqtt://test.mosquitto.org:1883
It is up to you which one you choose for the lab - perhaps try a few of them! As they are public brokers there is no guarantee of service (personally I found broker.hivemq.com slow). If you wish to have some reassurance of performance and authentication, there are several services available that offer a free tier such as cloudmqtt.
Equipment, Software
- Raspberry Pi 3 B
- SenseHAT
- Cloud MQTT Broker
- TinyDB and/or MLab MongoDB
Set up
Update the RPi
Run the following to make sure your RPi libraries are up to date:
sudo apt-get updateEclipse Paho
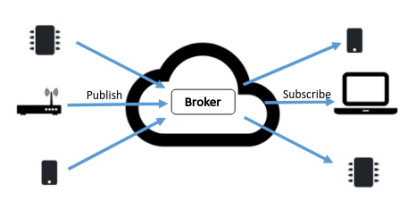
You will use the Eclipse Paho Python client library to create a publish and subscribe program as shown in the above diagram. Run the following command in the RPi To install the relevant libraries on the RPi:
sudo apt-get install mosquittosudo pip install paho-mqttSenseHat
You will need to install the relevant SenseHAT Python libraries. Run the following command in the RPi To install the relevant libraries on the RPi:
sudo apt-get install sense-hatPublish Temperature
- On the Raspberry Pi, create a directory called
mqttin your home directory andcdinto it:
mkdir ~/mqtt
cd mqtt- Create a new script called
client_pub.pyand enter the following code:
import paho.mqtt.client as mqtt
import urlparse
import sys
import time
import json
from sense_hat import SenseHat

sense = SenseHat()
sense.clear()
# Define event callbacks
def on_connect(client, userdata, flags, rc):
    print("Connection Result: " + str(rc))

def on_publish(client, obj, mid):
    print("Message ID: " + str(mid))

mqttc = mqtt.Client()

# Assign event callbacks
mqttc.on_connect = on_connect
mqttc.on_publish = on_publish

# parse mqtt url for connection details
url_str = sys.argv[1]
print(url_str)
url = urlparse.urlparse(url_str)
base_topic = url.path[1:]

# Connect
if (url.username):
    mqttc.username_pw_set(url.username, url.password)
mqttc.connect(url.hostname, url.port)
mqttc.loop_start()

# Publish a message to temp every 15 seconds
while True:
    temp=round(sense.get_temperature(),2)
    temp_json=json.dumps({"temperature":temp, "timestamp":time.time()})
    mqttc.publish(base_topic+"/temperature", temp_json)
time.sleep(15)- Examine the above code. The program expects a MQTT URL as the first command line argument. The connection details for MQTT broker as then parsed from the URL.
- You will publish the temperature reading to the following URL:
mqtt://iot.eclipse.org:1883/YOUR_ID/homewhere you replaceYOUR_IDin the URL with a memorable id of your choice (For example, I use my Github username,fxwalsh, so my URL is :mqtt://iot.eclipse.org:1883/fxwalsh/home). - The program publishes the temperature and a timestamp from the device in question, which in this case is the time in seconds since the 1/1/1970 as a floating point number(the Linux epoch).
- Run the program,
python client_pub.py mqtt://iot.eclipse.org:1883/YOUR_ID/homeand you should see an output to the console similar to the following:
mqtt://iot.eclipse.org:1883/fxwalsh/home
Message ID: 1
Connection Result: 0
Message ID: 2
Message ID: 3
Message ID: 4
The Message ID: ... indicates on_publish callback and is called every time a value is publuished to the broker. Connection Result: 0 is output from the on_connect callback and 0 is success but any other number indicates a refused connection. For a more detailed explaination see: Paho Callbacks.
Your RPi is now hopefully publishing temperature messages to the cloud MQTT broker. Any device can now subscribe and use this data.
NOTE: Leave this program running for the next section
Subscribe
Ideally you can create the following program on another computer/device that can run Python but, if you only have the RPi, or just for convenience, it's OK to run the following subscribe program on the RPi also(just pretend it's on another device somewhere else in the world!).
- If you are using another device/laptop to subscribe, create a new directory called
mqtt. - in the
mqttdirectory, create a new Python program file calledclient_sub.pywith the following content:
import paho.mqtt.client as mqtt
import urlparse
import sys

# Define event callbacks
def on_connect(client, userdata, flags, rc):
    print("Connection Result: " + str(rc))

def on_message(client, obj, msg):
    print("Topic:"+msg.topic + ",Payload:" + str(msg.payload))

def on_subscribe(client, obj, mid, granted_qos):
    print("Subscribed,  QOS granted: "+ str(granted_qos))

mqttc = mqtt.Client()

# Assign event callbacks
mqttc.on_message = on_message
mqttc.on_connect = on_connect
mqttc.on_subscribe = on_subscribe

# parse mqtt url for connection details
url_str = sys.argv[1]
url = urlparse.urlparse(url_str)
base_topic = url.path[1:]

# Connect
if (url.username):
    mqttc.username_pw_set(url.username, url.password)
mqttc.connect(url.hostname, url.port)

# Start subscribe, with QoS level 0
mqttc.subscribe(base_topic+"/#", 0)
mqttc.loop_forever()

# Continue the network loop, exit when an error occurs
rc = 0
while rc == 0:
    rc = mqttc.loop()
print("rc: " + str(rc))- Now run it as before, using the same URL used in for the publishing program as a command line argument. You should see data output to the console similar to the following:
Connection Result: 0
Subscribed,  QOS granted: (0,)
Topic:fxwalsh/home/temperature,Payload:{"timestamp": 1541453620.862879, "temperature": 34.48}
Topic:fxwalsh/home/temperature,Payload:{"timestamp": 1541453680.936523, "temperature": 34.41}
You now have a working MQTT publisher/subscriber!
Multiple Topics
The SenseHAT on the RPi has a few other environment sensors, for example pressure and humidity. If you presume to operate the RPi as a weather station, you need to publish this data also and create a suiable channel structure for MQTT.
+ On the RPi, stop client_pub.py by entering ctrl + c in the terminal window.
+ On the RPi, create a new script in ~/mqtt called client_pub_mult.py with the following content:
import paho.mqtt.client as mqtt
import paho.mqtt.publish as publish
import urlparse
import sys
import time
import json

from sense_hat import SenseHat

sense = SenseHat()
sense.clear()

# parse mqtt url for connection details
url_str = sys.argv[1]
print(url_str)
url = urlparse.urlparse(url_str)
base_topic = url.path[1:]
auth=None
# Connect
if (url.username):
    auth = {'username':url.username, 'password':url.password}


# Publish a message
while True:
    temp=round(sense.get_temperature(),2)
    humidity=sense.get_humidity()

    #Create JSON strings
    temp_sensor=json.dumps({"temperature":temp, "timestamp":time.time()})
    humidity_sensor=json.dumps({"humidity":humidity, , "timestamp":time.time()})

    #Create array of MQTT messages
    temp_msg={'topic': base_topic +"/temperature", 'payload':temp_sensor}
    hum_msg={'topic':base_topic +"/humidity", 'payload':humidity_sensor}
    msgs=[temp_msg,hum_msg]

    #Publish array of messages
    publish.multiple(msgs, hostname=url.hostname, port=url.port, auth=auth)
    print("published")
    time.sleep(15)
This time the program uses the publish.mutliple() function to send a list topics and payloads.
- The script is missing the pressure value. Inspect the script and update it to publish the pressure sensor reading to
/pressure.(hint: usesensor.get_pressure()to get the pressure value). All going well, you should observe output from the program similar to the following:
Topic:fxwalsh/home/temp,Payload:{'temperature': 34.7}
Topic:fxwalsh/home/humidity,Payload:{'humidity': 48.56332015991211}
Topic:fxwalsh/home/pressure,Payload:{'pressure': 1022.30786133}
Topic:fxwalsh/home/temp,Payload:{'temperature': 34.74}
Topic:fxwalsh/home/humidity,Payload:{'humidity': 48.578670501708984}
Topic:fxwalsh/home/pressure,Payload:{'pressure': 1022.31079102}
Payload size best practice
How many bytes are you using for the payload in each message at the moment? Payloads should be kept small as possible if only to be fair to others that use the Internet! In your report, suggest ways to reduce the size of the payload, for example:
{"Temperature": 20.635 }
24 bytes

{“t”:20.63}
11 bytes
How small could you make the temperature message?(hint: MQTT does not mandate the use of JSON and do you really need the "t")
At the moment you are publishing to 3 topics. In your report suggest a justification, if any, to do this. Furthermore, demonstrate with code, how you could combine temperature, pressure and humidity in one JSON message.
Data Persistence & Web APIs
You are producing data, but it's not persisted as of yet. You may need to access historical data at a later data for various reasons such as analytics, functional or regulatory reasons. Some online MQTT brokers offer a window of historical data but will probably lack the ability to extensively query the data. In this section you will now build a simple data acquisition device to persist your data both locally and remotely and use Web APIs to access that data. MQTT is now "moving" the data from a temperature sensor to a message broker. We can now write a data auisition program to move that data into a DB.
A DB on the RPi
Lets assume that your RPi will also function as your DB host. For this you can use a JSON-based database called TinyDB. You will do this on the RPi for now but in a real world scenario the DB would probably exiest be on another server or cloud based service.
- Install TinyDB on the RPi
pip install TinyDBWe'll create a separate MQTT subscription to persist our data and populate the database
- Make a copy of
client_sub.pycalledpersist_sub.pyand open it in an editor. Change the code in
persist_sub_pyas follows: <<<<<<< HEAD- add the import statement to include TinyDB, Query and json.
~~~python
import json
- add the import statement to include TinyDB and Query
>>>>>>> b6448529a7c5e7c377122710303456c0ac5a0729 from tinydb import TinyDB, Query db = TinyDB('db.json') - Find and change the subscription statement to just subscribe to temperature:
... # Start subscribe, with QoS level 0 mqttc.subscribe(base_topic+"/temperature", 0) ...- Replace the contents of the
on_messagecallback function with the following to insert the JSON into the DB:
print("Insering into DB: "+msg.payload) <<<<<<< HEAD msg_json=json.loads(msg.payload) db.insert(msg_json) ======= db.insert(msg.payload) >>>>>>> b6448529a7c5e7c377122710303456c0ac5a0729- add the import statement to include TinyDB, Query and json.
~~~python
Now run
persist_sub.py. Any temperature data published will now be persisted to the DB.If it's not still running, run ``client_pub.py'' program on the RPi again and leave it generate some temperature messages.
- Open
db.jsonin a text editor. You should see messages beginning to be the persisted in the file similar to the following:
{"_default": {"1": {"timestamp": 1541234209.524762, "temperature": "18.77"}, "2": {"timestamp": 1541234224.785746, "temperature": "18.77"},Simple Analytics
Lets say you want to analyse the data to find the following:
- Maximum temp recorded
- Minimum temp recorded
- Average temp recorded
You can do this both programatically and using the Python console as follows
In the same directory as the
db.jsonfile, start the Python console by typingpythonin a terminal window.Type the following commands
>>> from tinydb import TinyDB, Query
>>> db = TinyDB('db.json')
List all items in the db:
>>> for item in db:
...     print(item)
... (HIT RETURN ON THIS LINE!)
{u'timestamp': 1541453440.878712, u'temperature': 34.67}
{u'timestamp': 1541453455.783444, u'temperature': 34.5}
{u'timestamp': 1541453470.80211, u'temperature': 34.54}
{u'timestamp': 1541453485.814092, u'temperature': 34.63}
{u'timestamp': 1541453500.839073, u'temperature': 34.61}
{u'timestamp': 1541453515.855052, u'temperature': 34.76}
{u'timestamp': 1541453530.868686, u'temperature': 34.74}
{u'timestamp': 1541453545.887301, u'temperature': 34.5}
Find all occurrences of temperature less than 34.5:
>>> Temp = Query()
>>> db.search(Temp.temperature < 34.5)
[{u'temperature': 33.93}, {u'temperature': 33.84}, {u'temperature': 33.84}, {u'temperature': 33.84}, {u'temperature': 33.97}, {u'temperature': 33.86}, {u'temperature': 33.7}, {u'temperature': 34.06}, {u'temperat.....
>>>- Using the above examples, run the following python script to extract max,min and average temp.
from tinydb import TinyDB, Query
db = TinyDB('db.json')

## get a list of temps from the DB
temps = [float(item['temperature']) for item in db]
print(min(temps))
print(max(temps))
print(sum(temps)/len(temps))
Web API
Lets assume you wish to make the temperature data available via a web API. This might be useful for weather station dashboard or other applications, both current and in the future, that need access to the data.
- Install Flask
pip install flask- To allow cross origin requests (CORS). We will also use the
flask-corslibrary. Although not used in this lab, it would be useful if you use this API in another web application/web site.
pip install -U flask-corsFlask is a web framework written in Python that allow you, among other things, to implement web APIs.
- Create a Python module called
temp_db_data.pythat exposes the functions that do simple analysis on the data:
from tinydb import TinyDB, Query
import time,datetime
db = TinyDB('db.json')

temps = [float(item['temperature']) for item in db]

def min_temp():
    return min(temps)

def max_temp():
    return max(temps)

def mean_temp():
    return sum(temps)/len(temps)

def temp_items(start,end):
    temps = Query()
    return db.search((temps.timestamp >= start) & (temps.timestamp <= end))
You will create an API according to the following design:
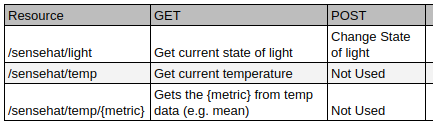
- Write a python program called
sense_api.pythat exposes the above module functions as a web API :
from flask import Flask, request
from flask_cors import CORS
import temp_db_data
from sense_hat import SenseHat

sense = SenseHat()

#clear sensehat and intialise light_state
sense.clear()


app = Flask(__name__)
CORS(app)

@app.route('/sensehat/temp',methods=['GET'])
def current_temp():
    temp=round(sense.get_temperature(),2)
    return str(temp)

@app.route('/sensehat/temp/<metric>',methods=['GET'])
def temp_metric(metric):
    if (metric== "mean"):
        return str(temp_db_data.mean_temp())
    if (metric== "max"):
        return str(temp_db_data.max_temp())
    if (metric== "min"):
        return str(temp_db_data.min_temp())
    return "Metric not found"

@app.route('/sensehat/light',methods=['POST'])
def light_post():
    state=request.args.get('state')
    print (state)
    if (state=="on"):
        sense.clear(255,255,255)
        return '{"state":"on"}'
    else:
        sense.clear(0,0,0)
        return '{"state":"off"}'

@app.route('/sensehat/light',methods=['GET'])
def light_get():
    #check top left pixel value(==0 - off, >0 - on)
    print(sense.get_pixel(0, 0))
    if sense.get_pixel(0, 0)[0] == 0:
        return '{"state":"off"}'
    else:
        return '{"state":"on"}'

if __name__ == "__main__":
    app.run(host='0.0.0.0', port=5000, debug=True)
Finally, configure Flask to use your service and run it by entering the following commands at the command line(**Note: this is for Unix/RPi):
FLASK_APP=hello.py
python temp_api.py
This will start the HTTP server on port 5000. You should now be able to access the API using HTTP.
Curl it
You can use Curl to check if the API is responding.
- Find the IP address of the RPi using the
ifconfigcommand - Run
Curl GETto request the URL resource you want...
curl http://YOUR_PI_IP:5000/sensehat/temp- Enter the above URL into the address field of a browser and you should see something similar to the following:

- Get the mean temperature as follows:
curl http://YOUR_PI_IP:5000/sensehat/temp/mean+Now try getting minimum and maximum recorded temperature by requesting sensehat/temp/min and sensehat/temp/max
- Turn on the LED array (light) using a
HTTP POSTrequest to/sensehat/lightwith the query stringstate=onas follows:
curl -X POST http://YOUR_PI_IP:5000/sensehat/light?state=on- Turn it off using a query string
state=off
curl -X POST http://YOUR_PI_IP:5000/sensehat/light?state=off- Find out the IP address of other people in your lab group. You should be able to make requests to their APIs also.