Objectives
inheritance · classes · fonts · colours · indentation · best practices
Setup
For some of the labs, we would like to build on a foundation established from the previous weeks work. However, we might find it useful to keep the project separate, so the earlier labs are preserved as we left them (in case we wish to revert to them). Normally this would be the task of a revision control system such as git or subversion. For the moment we will just duplicate the projects
You should have the files created from last week. If you do then make a copy of the Lab1 folder and name the new copy Lab2.
However, if you did not save the files or missed the class, here is the archive here of the completed lab (with exercises):
When you expand the zip file rename the top folder (lab01-incl-exercises) as Lab02. Save this Lab02 folder into your WebDevelopment folder that you created last week.
Open Sublime and navigate to Lab02:
Create a new folder called Deals, in that folder create a new page name it deals.html. Put the following code into the page and save.
<!DOCTYPE html>
<html>
  <head>
    <meta http-equiv="Content-Type" content="text/html; charset=ISO-8859-1" />
    <title>App Bundle Deals</title>
    <link type="text/css" rel="stylesheet" href="style.css" />
  </head>
  <body>
    <h2>Business Bundle</h2>
    <p>
      <img src="../images/business.png" alt="Business Bundle" />
        Here comes the next bundle for march. This time it's macware who publish a bundle. The so called macware Business Bundle contains 6 apps at a price of only $29.99 instead of $199.94. So you can save around 84%.
    </p>
    <a href="index.html">Home</a>
  </body>
</html>
This images needed for this page:


View the page in the web browser. What is wrong with it? We wrote all of the href path's the same as we had before so why do they not work for the link and the images? If we are viewing the deals web page stored in the deals folder, does that folder contain the index.html file? No is the simple answer so our path is incorrect. We must tell the browser to move up a level in the directories in order to find those pages. Your paths's should be as below for each link and for each image. It is very important at this stage to understand this example as you need to be able to write correct paths to your files and images.
<!DOCTYPE html>
<html>
  <head>
    <meta http-equiv="Content-Type" content="text/html; charset=ISO-8859-1" />
    <title>App Bundle Deals</title>
    <link type="text/css" rel="stylesheet" href="../style.css" />
  </head>
  <body>
    <h2>Business Bundle</h2>
    <p>
      <img src="../images/business.png" alt="Business Bundle" />
        Here comes the next bundle for march. This time it's macware who publish a bundle. The so called macware Business Bundle contains 6 apps at a price of only $29.99 instead of $199.94. So you can save around 84%.
    </p>
     <h2>Insanity Deal</h2>
    <p>
      <img src="../images/insanity.jpg" alt="Insanity Deal" />
        With the new $5 Insanity Deals from Bundlehunt you receive every day a highly reduced app for $5 only with savings up to 75%. Not a real bundle but, as there are multiple apps for only $5 each, one new per day, for the days to come.
    </p>
    <a href="../index.html">Home</a>
  </body>
</html>
On the index.html page add a link to the deals.html page. Test the link to make sure you have written the path correctly.
CSS Inheritance
Currently our CSS file looks like this:
h1, h2
{
  color: red;
}
body
{
  font-family:sans-serif;
}
h1
{
  border-bottom: 1px solid black;
}
Which produces the following style in the browser:

Add the following element around the text "great prices" in the main paragraph of the index.html page:
<em>great prices</em>This uses the <em> element, which introduces an emphasis style:
You may be able to see that this text is in italics.
We can introduce the following rule into our stylesheet (style.css) to target this specific element:
em
{
  color:red;
}
Save the stylesheet and refresh the page in the browser. The text 'great prices' should be in italics and the colour red.
When experimenting with CSS, we often want to experiment with the effects we are introducing. Specifically, introducing some rules, and then perhaps removing them again to see the difference (if any).
Take the body rule in your stylesheet and 'comment out' the font rule:
body
{
  /*font-family:sans-serif;*/
}
Save and reload. You should be able to notice the difference. This is called 'commenting' and is a common technique in both programming and web development. 'Uncomment' the rule again (remove the /* and */ symbols).
Now introduce the following rule:
p
{
  font-family:serif;
}
Have a close look at the resulting page. What type of font is used by the headings? What type for the paragraphs? Can you explain the difference? Comment out the body font rule again (as we did above). What is the effect?
CSS Classes
Open the deals.html file.
How would we style each heading 2 separately so that each bundle has a different colour text? Styling the <h2> element means that all <h2> elements are styled in the same way. We can define a class of elements, and then apply styles to any element that belongs to that class.
Go to the first h2 which holds the business bundle. This text we want to display as red. Add an attribute called class, with an id "special" to the <h2> element as below:
<h2 class="special">Business Bundle</h2>The heading 2 above now belongs to the "special" class. We can now apply rules to that class of elements. To select a class in CSS, you write the selector like this:
h2.special
{
  color: red;
}
This allows you to select all elements that belong to a particular class. Save your html file and your css file and reload the deals.html web page in your browser.
If you are having trouble with seeing the results in the browser it may be because the path to the style.css file is incorrect. The link in the deals.html page must show as below:
<link type="text/css" rel="stylesheet" href="../style.css" media="screen" />If you also wanted the paragraph to be associated with the same heading 2 class to be red in colour then you add an extra selector to your css rule
h2.special, p.special
{
  color: red;
}
You must also add the class name to the <p> element in your html file.
<p class="special">If we were to continue adding elements to a class this will get to be a lengthy process so we can write a rule for all the elements in a class:
.special
{
  color: red;
}
This will ensure that all elements of the "special" class are coloured red.
Your CSS might now be:
body
{
  font-family:sans-serif;
}

h1, h2
{
  color: gray
}

h1
{
  border-bottom: 1px solid black;
}

em
{
  color:red;
}

p
{
  font-family:serif;
}

.special
{
  color: red;
}
Fonts
Font families
Each font family contains a set of fonts that share common characteristics. There are five font familys: sans-serif, serif, monospace, cursive, and fantasy. Each family includes a large set of fonts. Fonts are not consistently available from one computer to another. The available fonts depends on the operating system as well as the fonts and applications that a user has installed. Here's a an example of how to use font-family:
body
{
  font-family: Verdana, Helvetica, Arial, sans-serif;
}
The font-family property provides you with a list of preferred fonts. The idea is that most browsers will have your first choice, in this case Verdana, but if none of the specific fonts can be found then the browser uses its default "sans-serif" font. Always put a generic font family name at the end, like "serif" or "sans-serif". Experiment with these in the style.css
Font sizes
Often the default sizes for headings are a bit large to change these defaults, we have four general techniques:
1. Specifying using pixels.
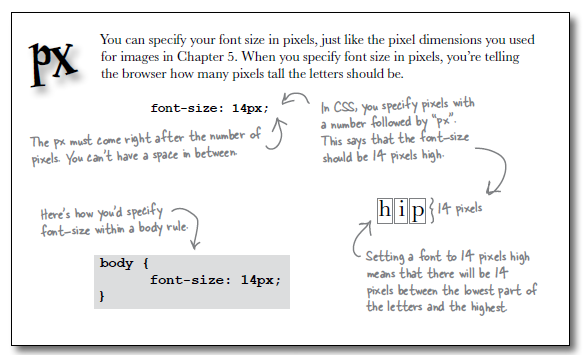
You can specify a font size in pixels. When you specify font size in pixels, you are telling the browser how many pixels tall the letters should be.
body
{
font-size: 14px;
}
The px must come directly after the number, there cannot be a space between them.
2. Specifying using percentage.
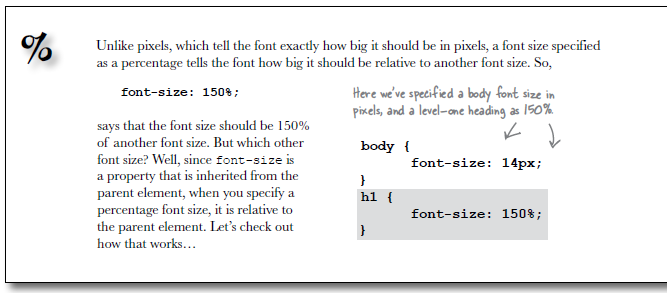
Unlike pixels, which tell the font exactly how big it should be in pixels, a font size specified as a percentage tells the font how big it should be relative to another font size.
h1
{
  font-size: 150%;
}
This says that the font size should be 150% of another font size. Font-size is a property that is inherited from the parent element, when you specify a % font size it is relative to the parent element. <h1> inherits from body so <h1> headings will be 150% of 14px.
3. Specifying using "em".
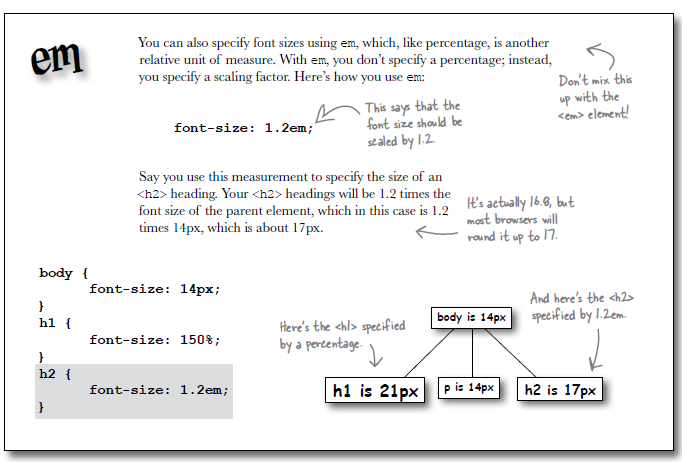
This like percentage is another unit of measure. With em you don't specify a percentage, instead you specify a scaling factor.
h2
{
  font-size: 1.2em;
}
If you use this to specify a <h2> heading your <h2> headings will be 1.2 times the font size of the parent element, which in this case is 1.2 times 14px, which is about 17px.
4. Specifying using keywords.
You can specify a font size as xx-small, x-small,small,medium, large, x-large, or xx-large and the browser will translate these keywords into pixel values using defaults that are set in the browser.
body
{
  font-size: small;
}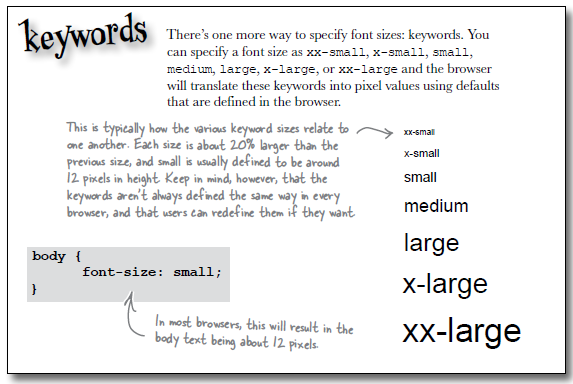
It is important to note that earlier version of Internet Explorer does not support text scaling when the font size is specified using pixels. Change the font sizes on web pages. Add in the relevant properties to your existing rules:
body
{
  font-size: small;
}
h1
{
  font-size: 150%;
}
h2
{
  font-size: 130%;
}
Save your css file and reload the home page. Take a look at the change in sizes.
Font Weight
The font weight property allows you to control how bold the text looks. Bold text looks darker than normal text and tends to be a bit fatter too. You can make any element use bold text by setting the font-weight property to bold.
p
{
  font-weight: bold;
}
You can also do it the other way, if you have an element that is set to bold by default, or is inheriting bold from a parent, then you can remove the bold.
h1
{
  font-weight: normal;
}
Experiment with changing the headings for the web site so that the bold is changed to normal weight. Add the rule to your CSS file and reload the web site. Once you have seen the difference in the headings, change it back to bold.
Colours
Web colours are specified in terms of how much red, green, and blue make up the colour. You specify the amount of each colour from 0 to 100% and then add them all together to arrive at a final colour.
You can use the names of colours, but CSS defines the names of only 17 colours. That number limits the expressiveness of your pages. By specifying colours in red, green and blue, you can have access to sixteen million colours.
Specifying Colour using colour names
The most straightforward way to describe a colour in CSS is just to use its name. For example to specify "silver" as the background colour of a body element:
body
{
  background-color: silver;
}
CSS colour names are case-insensitive, so you can type silver, Silver, or SILVER and all of them will work. But you must spell the word colour in the american way "color"
Specify in red, green and blue values.
If you want to specify an orange colour which consists of 80% red, 40% green and 0% blue:
body
{
  background-color: rgb(80%, 40%, 0%);
}
or you can specify it as numeric values between 0 and 255. So 80% of 255 is 204, 40% of 255 is 102, and 0% of 255 is 0.
body
{
  background-color: rgb(204, 102, 0);
}
Specify colour using hex codes.
Each set of two digits of a hex code represents the red, green and blue of the colour. The first two represent red, the second two green and the last two blue.
body
{
  background-color:  #cc6600;
}
Try out these colours on the web site.
We would like to keep the silver colour for the background of this website.
Font & Colour CSS
In your current style.css, change your CSS file so it now contains the following:
body
{
  font-family: Verdana, Helvetica, Arial, sans-serif;
  font-size:small;
}

h1, h2
{
  color: #007e7e;
}

h1
{
  font-size: 150%;
}

h2
{
  font-size: 130%;
}

p
{
 color: maroon;
}

.special
{
    color: red;
}
The default font family is sans-serif, this is last in the list, the others are alternatives. Save the file and load the home web page in your browser. The headings should now be in sans-serif and an aquamarine colour. The paragraph text is also sans-serif as all elements inherit the <body>s font-family property.
We now want to adjust the line height of the text on the entire page so that there's more vertical space between each line. To do that we add a line-height property in the existing body rule.
body
{
  /* as before */
  line-height: 1.6em;
}
This property allows us to specify the line height between each line. Like other font-related properties, you can specify the height in pixels, or using an em or percentage value that's relative to the font size. Save your CSS file and reload your web pages to see the change.
Try a few different line heights like 200%, .5em, and 20px to see the effect. Change the height back to 1.6em when you are finished.
More Content
We will rework the apps.html page with some more content to illustrate some interesting CSS rules. Replace the first paragraph with the following content:
  <!DOCTYPE HTML>
<html>
  <head>
    <title>Bundle APP Store</title>
    <link type="text/css" rel="stylesheet" href="style.css" media="screen" />
  </head>
  <body>
    <img src="images/banner.png"/>
      <h3>Freebie</h3>
     <p>
       Stacksocial just published its so called Free Ondesoft Mac Tool Bundle, which contains 5 apps from Ondesoft. The bundle worth $146 will be probably available only a couple of days so you’d better hurry up to get it.
     </p>
     <img src="images/star40.gif"/>
     <p>
       <img src="images/ondesoft.jpg" alt="Black Brain Brew Elixir" />
     </p>
     </p>
     <hr>
     <h3>Macware Business Bundle</h3>
     <p>
       Here comes the next bundle for march. This time its macware who publish a bundle. The so called macware Business Bundle contains 6 apps at a price of only $29.99 instead of $199.94. So you can save around 84%. There is n...
     </p>
     <img src="images/star45.gif"/>
     <a href="index.html">Home</a>
  </body>
</html>
The above content relies on a couple of new image files:


Save these files to your computer. To do this, right click on each one in turn and select save as. Then you can drag and drop them directly into the images folder in your lab02 folder.
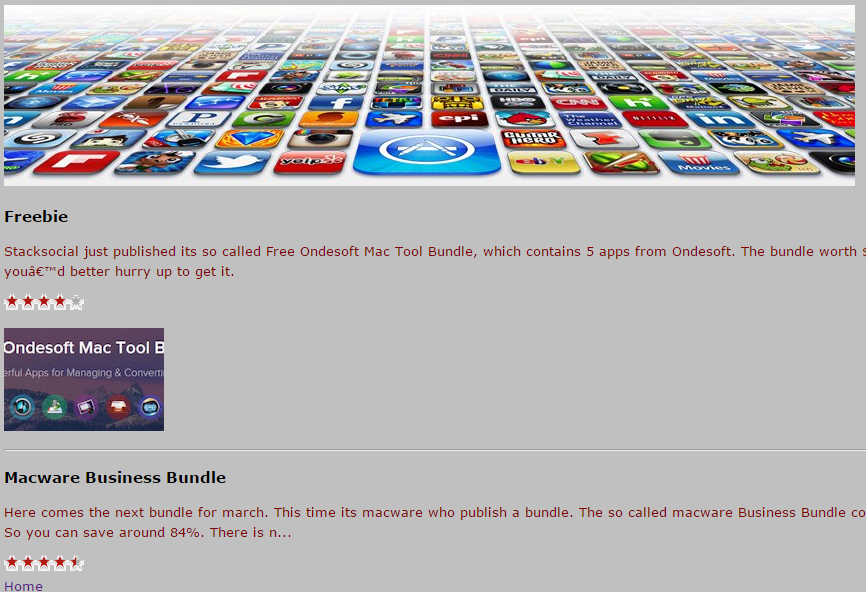
If all this goes according to plan, the app page should now look something like this:
Coding Best Practices
We should carefully inspect our html and verify that we are laying it out correctly, and in particular that we are obeying consistent indentation rules in the structure of the html itself.
Indentation is simply a consistent placement of spaces before each element, such that it flows in an ordered manner reflecting the opening/closing of tags. We prefer to use 2 spaces for each 'level'.
Example Inconsistent indentation:
<html>
<head>
<title>APP Store</title> <link type="text/css" rel="stylesheet" href="style.css" media="screen" /> </head>
<body>
<img src="images/score.png"/><h1>Score: Apps, Movies, Music, Books
</h1><ol> <li><a href="apps.html">Apps</a></li>
<li><a href="music.html">Music</a></li>
<li><a href="movies.html">Movies</a></li> </ol>
<h2>New Games</h2>
<ul> <li><img src="images/delete.png"/>Clear All</li>
<li><img src="images/google.jpg"/>Google Box</li>
<li><img src="images/squink.jpg"/>Squinks</li> </ul>
</body>
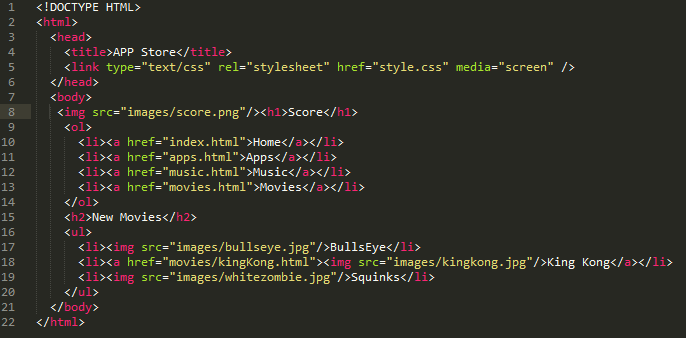
</html>Example Correct indentation
<html>
  <head>
    <title>APP Store</title>
    <link type="text/css" rel="stylesheet" href="style.css" media="screen" />
  </head>
  <body>
    <img src="images/score.png"/><h1>Score: Apps, Movies, Music, Books</h1>
    <ol>
      <li><a href="apps.html">Apps</a></li>
      <li><a href="music.html">Music</a></li>
      <li><a href="movies.html">Movies</a></li>
    </ol>
    <h2>New Games</h2>
    <ul>
      <li><img src="images/delete.png"/>Clear All</li>
      <li><img src="images/google.jpg"/>Google Box</li>
      <li><img src="images/squink.jpg"/>Squinks</li>
    </ul>
  </body>
</html>
Review your index.html file and ensure that it is correctly indented. One quick way to determine this is to 'fold' all the elements in the editor. To do this, hover the mouse beside the numbers listed in the left hand margin, downward arrows will appear. By clicking on the arrows the code will expand and collapse.
This will reduce your editing view to this:
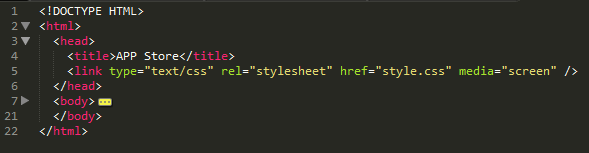
It is likely that your indentation will not look like the below, so take the opportunity now to line up all elements consistently. This can be tedious, and there are tools to do this automatically, but do it manually for the moment.
Exercises
Solution
This is a solution to the lab:
Exercise 1
In this lab you have experimented with colours, font-family, sizes and line heights. Apply what you have learnt to the directions page in your web site.
Exercise 2
Investigate on the mozilla site about the following properties:
- background-color
- background-image
- text-align
- text-shadow
- text-decoration
How might you apply them to your website?